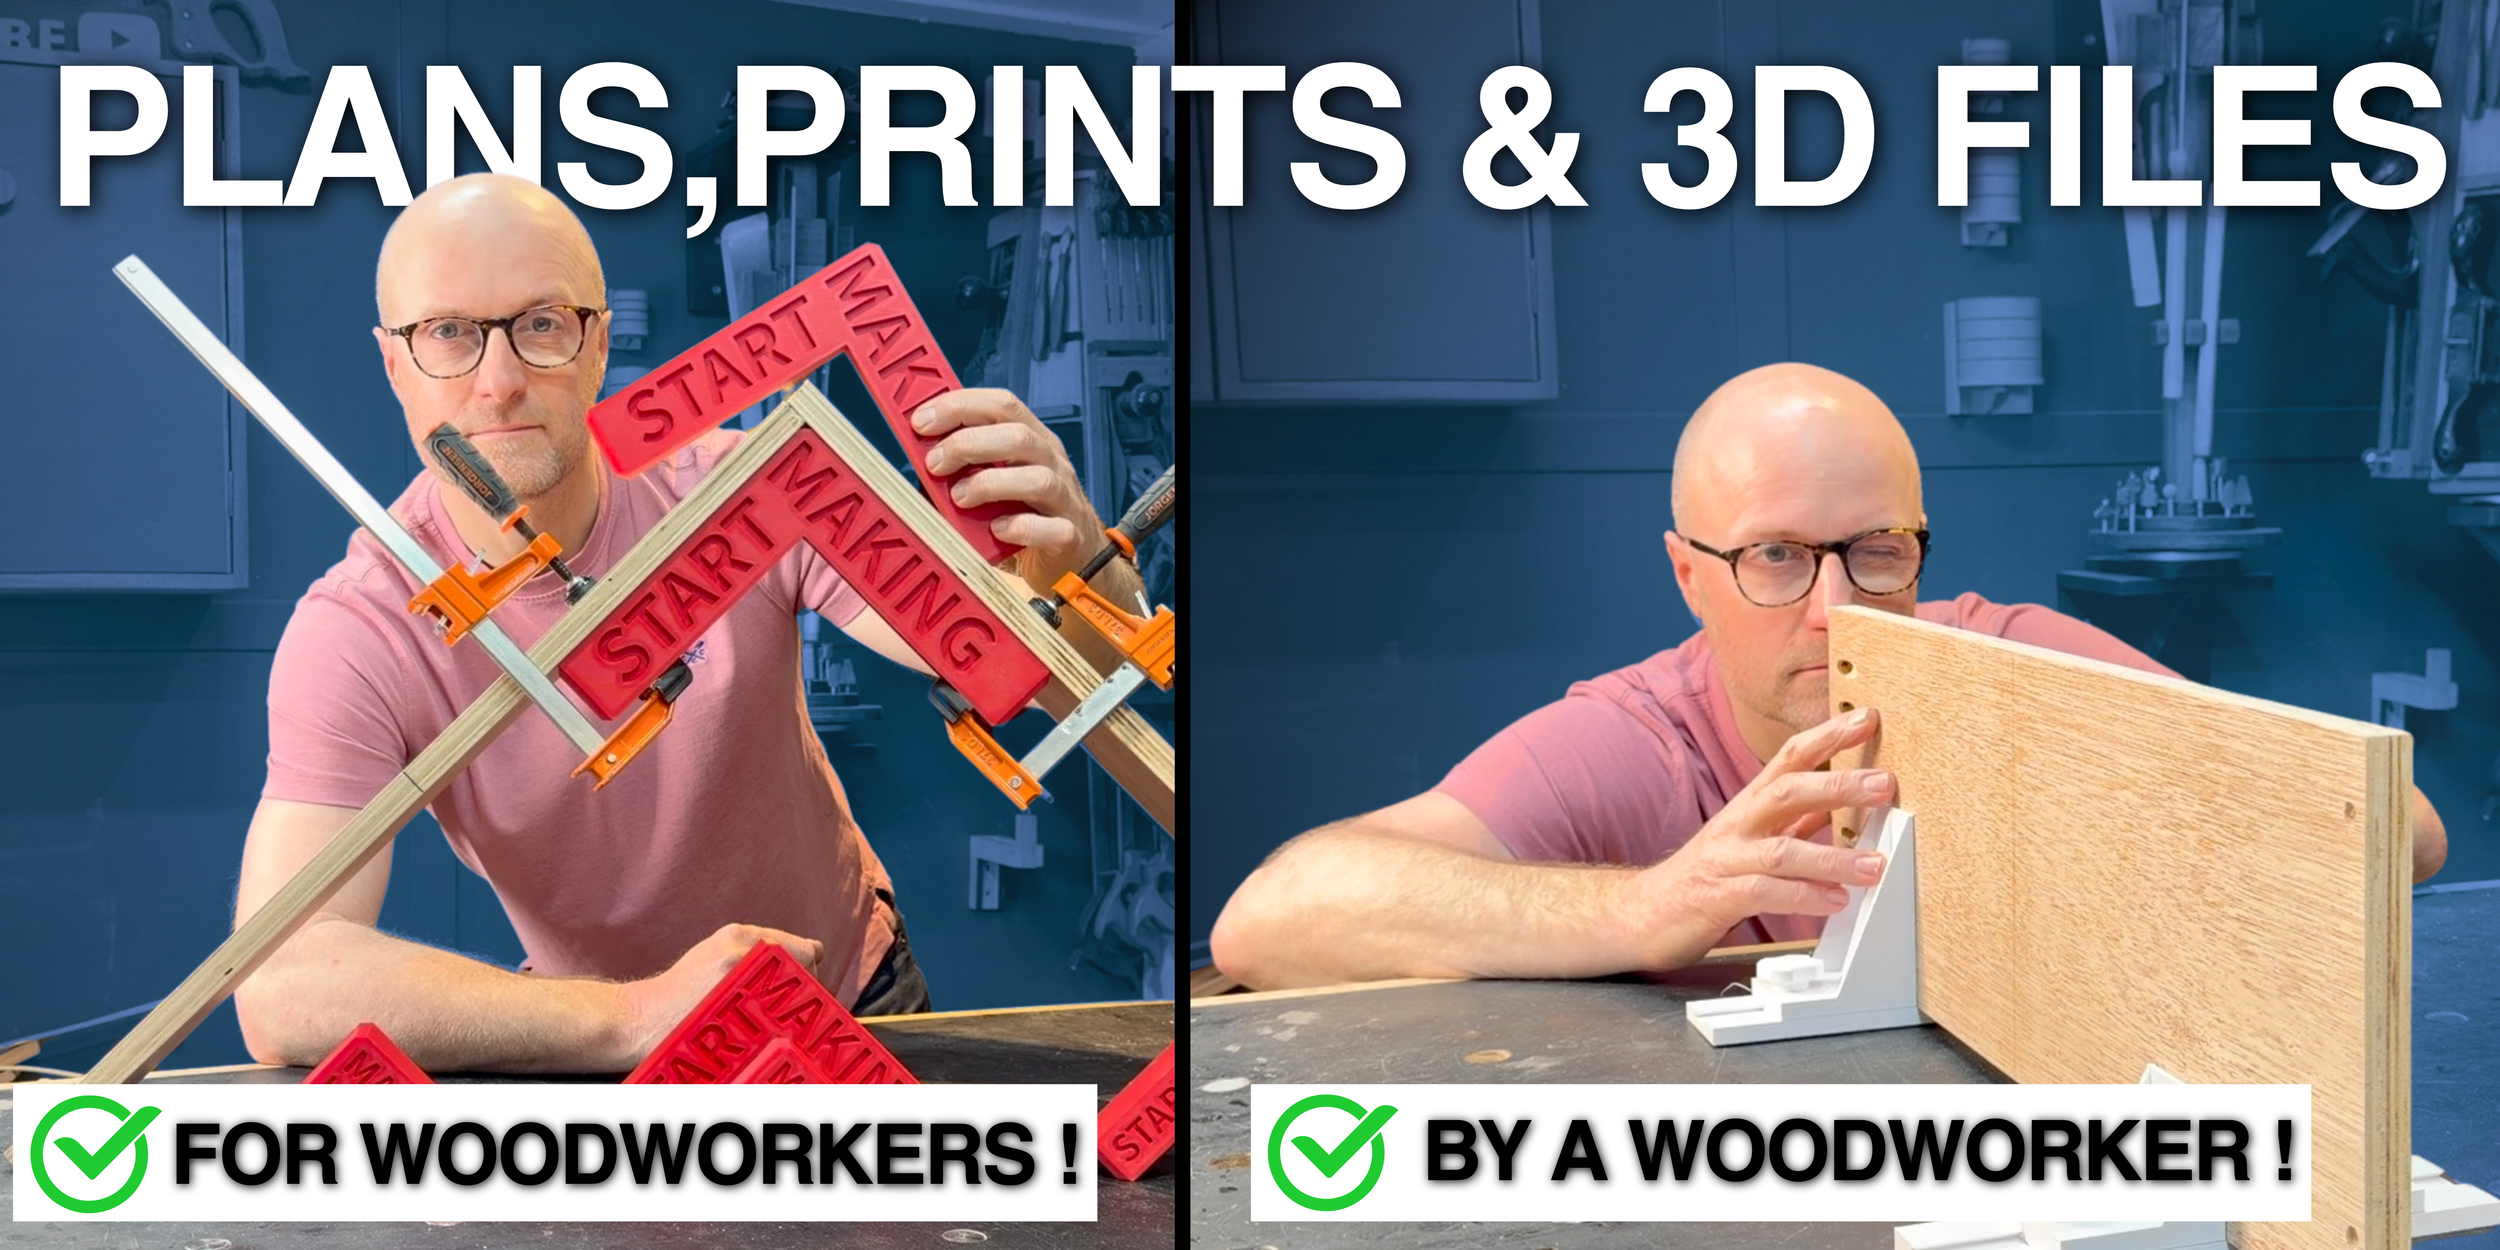
Best Sellers
This is the Version 2.0 of the Siding panel clamps. You can find the original in this bundle.
Please note that the parts are not interchangeable due to this being enlarged to cope with the larger hardware.
The aim here is to have a fully adjustable clamp that you can glue a dog into to allow it to be set into a workbench. Allowing you to clamp a board on its edge to do jobs like applying edge banding.
They can adjust from thin to well above 2 inches, 36mm and with the larger jaw option the board height can go up to at least 500mm.
Slide the locking bar into the track, place the jaw so that the holes align and apply the bolt. Tightening the bolt draws the bar into the jaw and locks it into the track.
I have taken the time to adapt the weak areas of the original, though it is perfectly capable of doing a good job and the bundle that it is included in provides many other items and for that reason offers greater perceived value.
All pieces but the bolt are printed with 4 walls and 25% infill
You will find many versions of the bolts, or screws as the files name them. The only one needed to be printed with 90% infill is the full M12 bolt.
The others are designed to be printed in the recommended alignment in order for the alignment to provide enough strength to mean 25% infill is enough.
Heres what it is and what’s been improved.
File 1 - Jaws
There are 2 main jaws, large and small. Both come straight with small or large holes depending on the method of locking, see below.
The large jaws also offer a tapered option where the top 10% is tapered to allow ease or locating the jaw should you want to do multiple boards without fully loosening the clamps.
File 2 - Locking bars.
The bar is determined by the style of locking used. The original had a 3d printed M12 bolt and there is a bar with a printed thread to match.
There are bars with 3 differing sized holes to allow you to add in a threaded insert after printing the bar. Use this with hardware such as star knobs (male)
All hardware suggestion are at the end along with the link to the video showing the entire clamp upgrade.
There is also a bar with a hexagon recess on the underneath to allow for an M6 bolt or nut to be recessed. the nut can be used with a star knob (male) the bolt with a star knob (female) This latter one is my preferred method of all. (though 3d printed bolts are fun, see below)
File 3 - Locking screws.
Multiple options here all used with the 3d printed thread locking bar.
1 - The original 3d printed M12 bolt. Ensure you do one of the following for strength.
Print upright, 90% infill
Print at 45 degrees or full 90 degrees to base 25% infill
Add in a 90% Modifier along the thread so strengthen. (all details in video linked below)
2 - 2 halves - This allows you to print the bolt in 2 halves, each one lying flat for strength. They can then be glued together.
3 - Screw inner third only - less filament and more strength as it is printed flat. I like this option.
4 - Screw with cross removed - Clever but weaker than other options.
5 - Screw with split and bar - Clever again and easier to align than the 2 halves. But you need good tolerances to ensure a good fit.
My personal recommendation in the video is if you re to print then either do the full bolt and align it flat (the weakest way), then add in a 90% modifier or print the inner third only screw flat on your print bed.
File 4 - Tracks
This is a larger track than the original (wider) to incorporate the larger pieces.
1 - just a track with 3 dog holes spaced at 96mm centres. For those people with cnc cut mft tops.
2 - Track with one dog set to slide to cope with slight discrepancies with drill located holes of you have drilled your own dog holes into your work bench aiming at 96mm centres.
When printing these items please allow supports on the tracks and if you align any bolts to 45 or 90 degrees. Also the bars with recessed hexagons need supports too. The tapered jaws work best with supports, how you align them is up to you, I got best results with the tapered surface on the bed.
Other jaws I have the face that meets the wood on the bed.
If you would like to refer to the videos please see the Link below.
Video 1 - https://youtu.be/jDvmnjlwDaY
Here are the hardware links. Please note that they are affiliate links and as such the channel makes a small commission at no cost to you.
Nitrile bonded cork for grip on the jaws.
UK LINK -https://amzn.to/3Qokaad
US LINK - https://amzn.to/4bCD1mW
M6 Hex bolts 6mm x 25mm
UK LINK - https://amzn.to/4dXrbaY
US LINK - https://amzn.to/3SsUIRm
M6 Nuts
UK LINK - https://amzn.to/4estTFE
US LINK - https://amzn.to/440rVWR
STAR KNOBS M6 (male)
UK LINK - https://amzn.to/43V7tXu
US LINK - https://amzn.to/4dUEdGe
STAR KNOBS (female)
UK LINK - https://amzn.to/4g8cC5L
US LINK - https://amzn.to/4uZkb3u
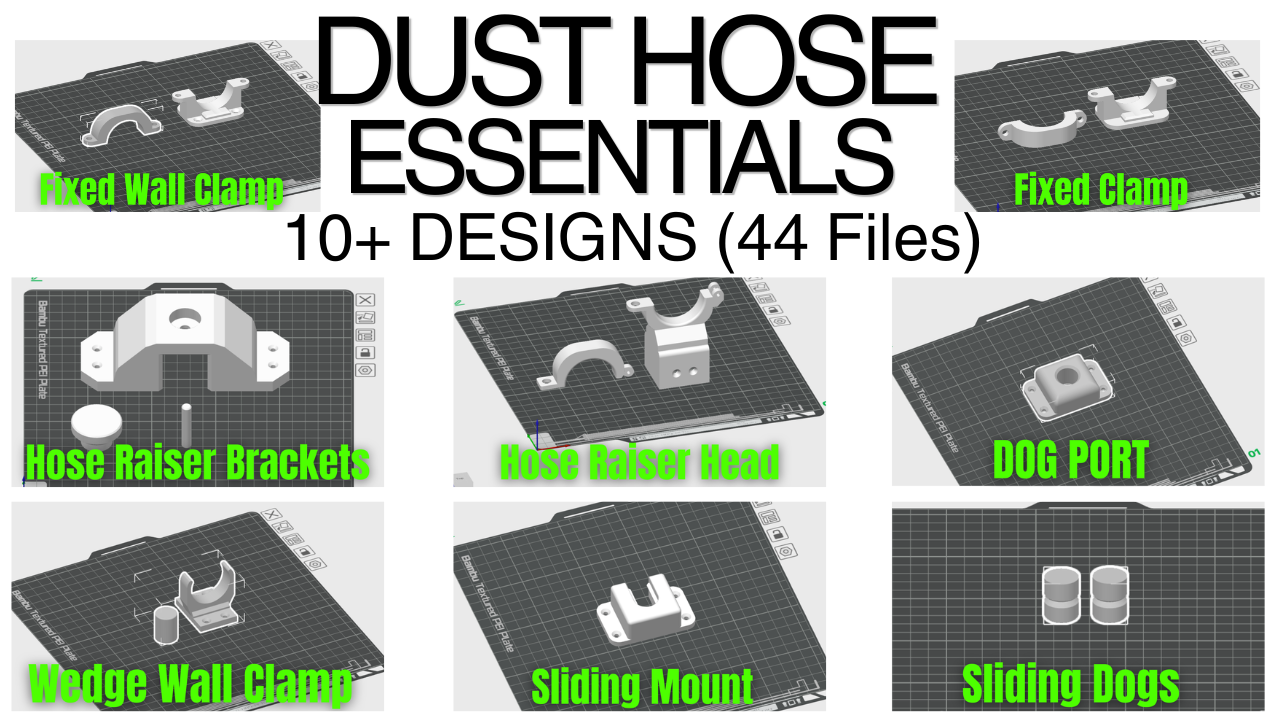
Everything you need to add control to your ungainly dust extraction hose. And More.
This bundle is designed to be used with the thinner hoses from dust extractors rather than the larger chip collector hoses.
The bundle contains 4 identical folders, each one adapted for the 4 commons hose sizes 26mm, 32mm, 35mm and 38mm. Though you may find that like me, if you have the festool 35mm hose that the 38mm clips fit better on the main body of the hose, whereas the 35mm clips fit better close to the nozzle. This is why you get all 4 size related bundles for one price. Chop and change as needed.
Each bundle includes the same items, each scaled to the best fit for the hose.
For strength I used 6 walls, 35% infill with gyroid. But you can adapt if you feel you need more or less strength / more of less print time.
Contents of each bundle.
The pictures also describe these files better than my words.
File1 - The Hose Raiser head - designed to be used when making your own dust hose raiser.
The raiser supports your hose above your work so you dont have to carry the weight. Simple attach the raiser head on the top of a 35mm square length of wood and you are on your way . See this video for full build.
The only construction needed is to glue a 3mm pin into the hinge. For mine the fit was so tight I didnt need to use glue. If you do need glue, ensure no glue makes contact with the inner hinge piece.
File 2 - Hose Raiser Brackets and pins - These attach to the side of your cabinet or workbench to support the hose raiser bar. I recommend 2 per build, and keep them pretty close and high on the side of whatever you plan to attach your raiser to. That way you get stability when it is up high. These too are designed to be a tight fit for a 35mm square bar. There is a pin in the file too that comes in 2 parts, the first is the grip and the second the pin itself. I found printing these separate and gluing together the pieces worked best.
File 3 - Hose holder fixed clamp - This permanently attaches to the hose close to the nozzle. The Dog is printed separate, simply glue the dog into the recess under the clamp allowing you to mount your hose in a dog hole in your bench. See the video for full details and whether to use a sliding dog or normal dog. Both are included in the bundles. (recommend the sliding dog as a best of both worlds solution)
File 4 - Hose holder fixed wall clamp - Designed to be attached to your dust hose in an area where you want to permanently fix it to the wall or ceiling.
File 5 - Hose holder sliding mount - A wall bracket designed to be used with the sliding dog and fixed clamp so you can place the mount anywhere you wish to hold your hose allowing for easy access. Simple slide it on to fix it in place and slide it off to use it.
File 6 - Dog port loose and tight - Simple dog holes that you can fix to the wall where, much like the sliding mount you can push your affixed fixed clamp in using the dog and friction to hold it in place.
File 7 - Hose holder wedge wall and dog - An open hose holder that you can fix to your wall or ceiling to hold your hose in place allowing for quick release and use.
File 8 - Slimline hose holder wedge - as above but more slimline, ie closer to the wall or ceiling. Use the one that suits your needs and clearance requirements best.
File 9 - Simple 19.9mm dog - The dog as a separate file so you can print and glue it into the fixed clamp as needed.
File 10 - Sliding dog - as above but with the tapered groove allowing for use with the hose holder sliding mount.
If there are any questions, answers will most likely be found in the following videos.
The pictures also describe these files better than my words.

Full color, easy to follow, and suitable for all skill levels, these plans will give you everything you need to know to build my Ultimate Tool Storage Cabinet.
The cabinet design is 636mm wide by 600mm high and 240mm deep.

20 Workbench Dog STL 3D Print files to get you started.
This bundle is for work benches with 20mm diameter dog holes.
All Dogs are approx 19.5mm diameter to give a snug but not overly tight fit.
Adjustments can be made in your printer studio to account for your printers calibration.
There is also a bundle for the ¾ inch dog holes that a few tables come with. These Dogs are designed to be 18.8mm diameter.
Everything seen in this video https://youtu.be/YcbPrWksWXY
There are 9 overall designs with different variants that make the total of 20 plus files.
Suitable for workbenches with 20mm dog holes but easily adaptable for different sizes by simply scaling the files in your print studio.
This pack works out far better value than buying individual files and also has a video dedicated to showing you the prints and how they work along with how to adapt them for best performance.
Save the experimenting time and the trial and error. Just print and head off to the workshop to get building.
The Slicer instructions are pretty simple. I take the standard Bambu Lab settings for everything, then add on supports, increase wall passes to 3 and have the infill at 15%, thought if you find the right angle block in particular has too much flex you can increase the fill.
Here are the files you get.
File 1.
Workbench Cookies (3 variants)
Mini Cookie - Small radius and thickness
Medium Cookie - Slightly larger radius and thickness
Thick Cookie - full 100mm radius and double thickness.
NB. In the video you see me glue nitrile cork to these for grip. These only work well with a grip added to the top.
File 2.
The Dog Tray
A tray to hold all of your bench dogs, aimed at painters pins and dogs.
File 3.
Flexi Blocks (2 variants)
Standard flexi block - long or short option.
Multi Flexi Block - 4 dimension adjustable block.
File 4.
Painters Pins.
A 2 piece operation for an easy print. Simple print then glue the 2 parts together.
File 5.
Flexi Planing Bar Stops (2 Varients)
Aimed at standard MFT tables with holes spaced at 96m centres. But due to the flexi design if your holes are slightly off, these still work.
Short Bar - Spans 2 holes
Long Bar - Spams 3 holes
File 6.
Right Angle Flexi Support Block (3 variants)
Support your work while drilling, screwing or clamping. Aimed at standard MFT tables with holes spaced at 96m centres. But due to the flexi design if your holes are slightly off, these still work.
Thin Support - Lightweight and thin, can flex a little under pressure.
Medium support - Thicker for added strenght
Thick Support - Thick enough to support more pressure.
File 7.
Standard Dogs (2 variants)
Just your standard workbench dogs with a round pin to fit the 20mm dog hole and a flat face to butt your work against.
Narrow edge - Designed to stop your dog falling into the hole too deep, while not requiring supports when printed.
Thick edge - Cleaner results but requires supports for the best finish.
File 8.
v Block Dogs. (2 variants)
For supporting square stock at a 45 degree twist. Hold work for Chamfering or any other operation where access to the corner edge is needed. Use one with a stop and one without in tandem.
V block with round dog - standard round dog, requires supports for better quality print.
V block with round dog and stop - as above but with a stop to support your piece from moving forwards.
V block with Hexagon dog - Does not require support to print but is a little looser in the dog hole.
V block with Hexagon dog and stop - as above but with a stop to support your piece from moving forwards.
File 9.
Thick Dog
Longer depth dog compatible with the thickest right angle block to provide more support.
NEW Releases.

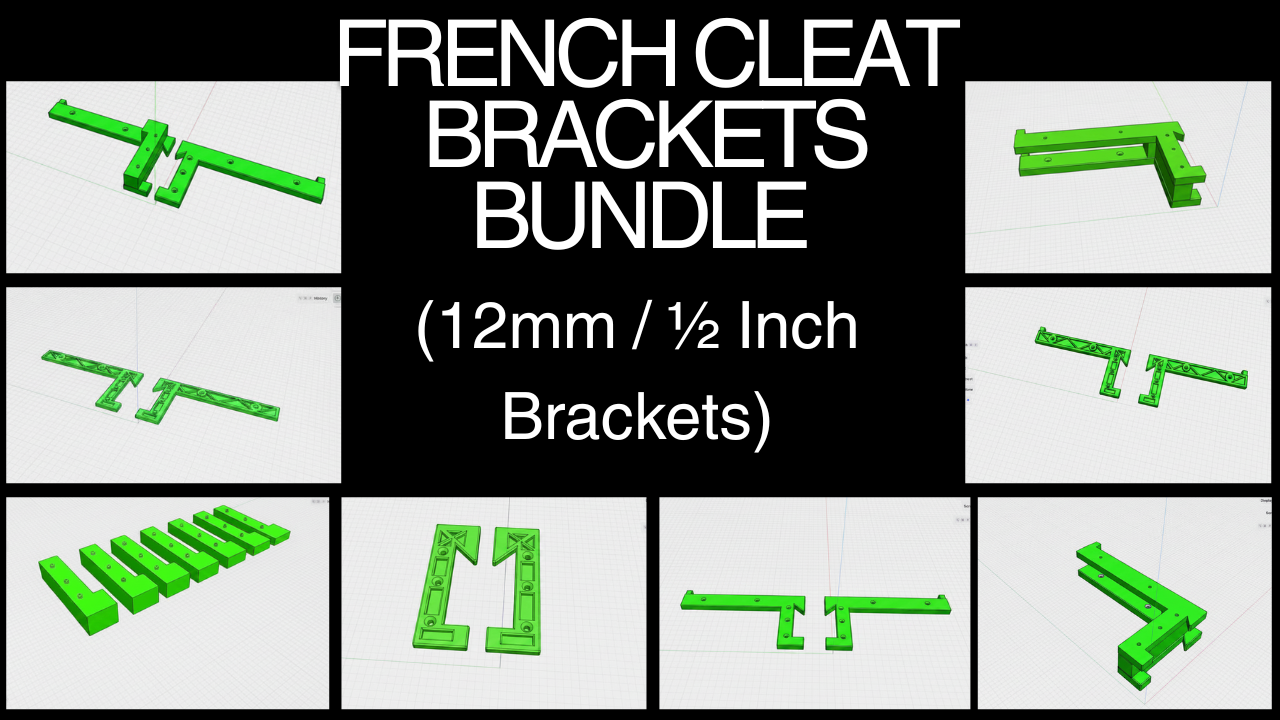
All the files you need to have not only the standard French cleat brackets, but also the extended ones designed to give more support, and the best part, the clamp holder cleat brackets, both thick and thin.
These are designed to work with 3/4 inch plywood French cleats, (18mm)
The Wall cleat batons can be up to 50mm wide for these to work.
For the Clamp brackets there is also a full set of spacers available to ensure your clamps are supported perfectly. See the description below.
Please note that the standard and extended brackets are designed to be used with light weight tool holders and shelves due to the fact that unlike wooden ones they can only be screwed to the holder rather than glued and screwed. That said, CA glue will attach these to the holder if you print in PETG.
For all of the files I recommend 4 walls and 25% infill. But feel free to increase the numbers of you require more strength expecially with the longer extended and clamp brackets.
Files included.
File 1 - Standard Cleat.
As described this is the smallest of the bundle, a simple design with 3 screw holes for easy attachment. Apply one to each side of the holder you wish to hang ensuring that the back of the holder lines up to the flat back part of the brackets. If the brackets are level then the work is done.
File 2 - Extended Cleat Bracket.
As above but with additional length to provide more support. I use these for holders that project further from the wall. You could cut these if you dont require the entire extension.
File 3 - Clamp Holder Cleat Bracket.
These are almost identical to the extended cleats but have additional raised ends to stop f style and squeezer clamps from falling off the front.
You can also use them to hold hammers, draw knives, brooms, etc.
Print a pair and where the other brackets are attached with the countersink hole on the outside, these are used with the countersinks facing inwards. The purpose of this is to align the spacer blocks, description below. I advise you choose the spacer block, larger but as close as possible to the width of the bar of the clamp you wish to store, that way you get the most support and the clamps will not swing from side to side. Each spacer has raised nobbles to fit inside the clamps. See the picture on the page for alignment. NB the extended part of the spacer follows the extension of the bracket away from the wall.
Spacers are attached with an appropriate glue for the filament used. For PETG I have used CA glue.
File 4 - Thick Clamp Holder Cleat Bracket.
Identical to the Clamp Holder Cleat bracket but thicker. I found that File 3 was the best for filament use but tended to bend slightly away at the tips when 6 clamps were stored. So these thicker ones offer less bend and more stability.
File 5 - Small and Medium thick clamp holder brackets.
I have recently added these as the full length thick clamp holder brackets are brilliant for clamps and such but for smaller items like a hammer or blue tapes, these are better and use less filament. The same spacer blocks still work.
File 6 - Spacers.
There are a number of spacer blocks designed to be used with the clamp brackets.
They cover the following thicknesses.
10mm
12mm
14mm
16mm
18mm
20mm
22mm
24mm
29mm
35mm
40mm
All cleat brackets have a lower stabilising part that also doubles as a method of locking the cleat to the wall baton. A simple wedge between the lower part of the wall baton and the cleat stabiliser will do the job. These are not provided as every cleat width will be different. I cut mine from scrap plywood.
All the files you need to have not only the standard French cleat brackets, but also the extended ones designed to give more support, and the best part, the clamp holder cleat brackets, both thick and thin.
These are designed to work with 1/2 inch plywood French cleats, (12mm)
The Wall cleat batons can be up to 50mm wide for these to work.
For the Clamp brackets there is also a full set of spacers available to ensure your clamps are supported perfectly. See the description below.
Please note that the standard and extended brackets are designed to be used with light weight tool holders and shelves due to the fact that unlike wooden ones they can only be screwed to the holder rather than glued and screwed. That said, CA glue will attach these to the holder if you print in PETG.
For all of the files I recommend 4 walls and 25% infill. But feel free to increase the numbers of you require more strength expecially with the longer extended and clamp brackets.
Files included.
File 1 - Standard Cleat.
As described this is the smallest of the bundle, a simple design with 3 screw holes for easy attachment. Apply one to each side of the holder you wish to hang ensuring that the back of the holder lines up to the flat back part of the brackets. If the brackets are level then the work is done.
File 2 - Extended Cleat Bracket.
As above but with additional length to provide more support. I use these for holders that project further from the wall. You could cut these if you dont require the entire extension.
File 3 - Clamp Holder Cleat Bracket.
These are almost identical to the extended cleats but have additional raised ends to stop f style and squeezer clamps from falling off the front.
You can also use them to hold hammers, draw knives, brooms, etc.
Print a pair and where the other brackets are attached with the countersink hole on the outside, these are used with the countersinks facing inwards. The purpose of this is to align the spacer blocks, description below. I advise you choose the spacer block, larger but as close as possible to the width of the bar of the clamp you wish to store, that way you get the most support and the clamps will not swing from side to side. Each spacer has raised nobbles to fit inside the clamps. See the picture on the page for alignment. NB the extended part of the spacer follows the extension of the bracket away from the wall.
Spacers are attached with an appropriate glue for the filament used. For PETG I have used CA glue.
File 4 - Thick Clamp Holder Cleat Bracket.
Identical to the Clamp Holder Cleat bracket but thicker. I found that File 3 was the best for filament use but tended to bend slightly away at the tips when 6 clamps were stored. So these thicker ones offer less bend and more stability.
File 5 - Small and Medium thick clamp holder brackets.
I have recently added these as the full length thick clamp holder brackets are brilliant for clamps and such but for smaller items like a hammer or blue tapes, these are better and use less filament. The same spacer blocks still work.
File 6 - Spacers.
There are a number of spacer blocks designed to be used with the clamp brackets.
They cover the following thicknesses.
10mm
12mm
14mm
16mm
18mm
20mm
22mm
24mm
29mm
35mm
40mm
All cleat brackets have a lower stabilising part that also doubles as a method of locking the cleat to the wall baton. A simple wedge between the lower part of the wall baton and the cleat stabiliser will do the job. These are not provided as every cleat width will be different. I cut mine from scrap plywood.
This is the Version 2.0 of the Siding panel clamps. You can find the original in this bundle.
Please note that the parts are not interchangeable due to this being enlarged to cope with the larger hardware.
The aim here is to have a fully adjustable clamp that you can glue a dog into to allow it to be set into a workbench. Allowing you to clamp a board on its edge to do jobs like applying edge banding.
They can adjust from thin to well above 2 inches, 36mm and with the larger jaw option the board height can go up to at least 500mm.
Slide the locking bar into the track, place the jaw so that the holes align and apply the bolt. Tightening the bolt draws the bar into the jaw and locks it into the track.
I have taken the time to adapt the weak areas of the original, though it is perfectly capable of doing a good job and the bundle that it is included in provides many other items and for that reason offers greater perceived value.
All pieces but the bolt are printed with 4 walls and 25% infill
You will find many versions of the bolts, or screws as the files name them. The only one needed to be printed with 90% infill is the full M12 bolt.
The others are designed to be printed in the recommended alignment in order for the alignment to provide enough strength to mean 25% infill is enough.
Heres what it is and what’s been improved.
File 1 - Jaws
There are 2 main jaws, large and small. Both come straight with small or large holes depending on the method of locking, see below.
The large jaws also offer a tapered option where the top 10% is tapered to allow ease or locating the jaw should you want to do multiple boards without fully loosening the clamps.
File 2 - Locking bars.
The bar is determined by the style of locking used. The original had a 3d printed M12 bolt and there is a bar with a printed thread to match.
There are bars with 3 differing sized holes to allow you to add in a threaded insert after printing the bar. Use this with hardware such as star knobs (male)
All hardware suggestion are at the end along with the link to the video showing the entire clamp upgrade.
There is also a bar with a hexagon recess on the underneath to allow for an M6 bolt or nut to be recessed. the nut can be used with a star knob (male) the bolt with a star knob (female) This latter one is my preferred method of all. (though 3d printed bolts are fun, see below)
File 3 - Locking screws.
Multiple options here all used with the 3d printed thread locking bar.
1 - The original 3d printed M12 bolt. Ensure you do one of the following for strength.
Print upright, 90% infill
Print at 45 degrees or full 90 degrees to base 25% infill
Add in a 90% Modifier along the thread so strengthen. (all details in video linked below)
2 - 2 halves - This allows you to print the bolt in 2 halves, each one lying flat for strength. They can then be glued together.
3 - Screw inner third only - less filament and more strength as it is printed flat. I like this option.
4 - Screw with cross removed - Clever but weaker than other options.
5 - Screw with split and bar - Clever again and easier to align than the 2 halves. But you need good tolerances to ensure a good fit.
My personal recommendation in the video is if you re to print then either do the full bolt and align it flat (the weakest way), then add in a 90% modifier or print the inner third only screw flat on your print bed.
File 4 - Tracks
This is a larger track than the original (wider) to incorporate the larger pieces.
1 - just a track with 3 dog holes spaced at 96mm centres. For those people with cnc cut mft tops.
2 - Track with one dog set to slide to cope with slight discrepancies with drill located holes of you have drilled your own dog holes into your work bench aiming at 96mm centres.
When printing these items please allow supports on the tracks and if you align any bolts to 45 or 90 degrees. Also the bars with recessed hexagons need supports too. The tapered jaws work best with supports, how you align them is up to you, I got best results with the tapered surface on the bed.
Other jaws I have the face that meets the wood on the bed.
If you would like to refer to the videos please see the Link below.
Video 1 - https://youtu.be/jDvmnjlwDaY
Here are the hardware links. Please note that they are affiliate links and as such the channel makes a small commission at no cost to you.
Nitrile bonded cork for grip on the jaws.
UK LINK -https://amzn.to/3Qokaad
US LINK - https://amzn.to/4bCD1mW
M6 Hex bolts 6mm x 25mm
UK LINK - https://amzn.to/4dXrbaY
US LINK - https://amzn.to/3SsUIRm
M6 Nuts
UK LINK - https://amzn.to/4estTFE
US LINK - https://amzn.to/440rVWR
STAR KNOBS M6 (male)
UK LINK - https://amzn.to/43V7tXu
US LINK - https://amzn.to/4dUEdGe
STAR KNOBS (female)
UK LINK - https://amzn.to/4g8cC5L
US LINK - https://amzn.to/4uZkb3u
Workshop Upgrades

20 Workbench Dog STL 3D Print files to get you started.
This bundle is for work benches with ¾ inch diameter dog holes.
All Dogs are approx 18.8mm diameter to give a snug but not overly tight fit.
Adjustments can be made in your printer studio to account for your printers calibration.
There is also a bundle for the 20mm dog holes that a few tables come with. These Dogs are designed to be 19.5mm diameter.
Everything seen in this video https://youtu.be/YcbPrWksWXY
There are 9 overall designs with different variants that make the total of 20 plus files.
Suitable for workbenches with ¾ inch dog holes but easily adaptable for different sizes by simply scaling the files in your print studio.
This pack works out far better value than buying individual files and also has a video dedicated to showing you the prints and how they work along with how to adapt them for best performance.
Save the experimenting time and the trial and error. Just print and head off to the workshop to get building.
The Slicer instructions are pretty simple. I take the standard Bambu Lab settings for everything, then add on supports, increase wall passes to 3 and have the infill at 15%, thought if you find the right angle block in particular has too much flex you can increase the fill.
Here are the files you get.
File 1.
Workbench Cookies (3 variants)
Mini Cookie - Small radius and thickness
Medium Cookie - Slightly larger radius and thickness
Thick Cookie - full 100mm radius and double thickness.
NB. In the video you see me glue nitrile cork to these for grip. These only work well with a grip added to the top.
File 2.
The Dog Tray
A tray to hold all of your bench dogs, aimed at painters pins and dogs.
File 3.
Flexi Blocks (2 variants)
Standard flexi block - long or short option.
Multi Flexi Block - 4 dimension adjustable block.
File 4.
Painters Pins.
A 2 piece operation for an easy print. Simple print then glue the 2 parts together.
File 5.
Flexi Planing Bar Stops (2 Varients)
Aimed at standard MFT tables with holes spaced at 96m centres. But due to the flexi design if your holes are slightly off, these still work.
Short Bar - Spans 2 holes
Long Bar - Spams 3 holes
File 6.
Right Angle Flexi Support Block (3 variants
Support your work while drilling, screwing or clamping. Aimed at standard MFT tables with holes spaced at 96m centres. But due to the flexi design if your holes are slightly off, these still work.
Thin Support - Lightweight and thin, can flex a little under pressure.
Medium support - Thicker for added strenght
Thick Support - Thick enough to support more pressure.
File 7.
Standard Dogs (2 variants)
Just your standard workbench dogs with a round pin to fit the 20mm dog hole and a flat face to butt your work against.
Narrow edge - Designed to stop your dog falling into the hole too deep, while not requiring supports when printed.
Thick edge - Cleaner results but requires supports for the best finish.
File 8.
v Block Dogs. (2 variants)
For supporting square stock at a 45 degree twist. Hold work for Chamfering or any other operation where access to the corner edge is needed. Use one with a stop and one without in tandem.
V block with round dog - standard round dog, requires supports for better quality print.
V block with round dog and stop - as above but with a stop to support your piece from moving forwards.
V block with Hexagon dog - Does not require support to print but is a little looser in the dog hole.
V block with Hexagon dog and stop - as above but with a stop to support your piece from moving forwards.
File 9.
Thick Dog
Longer depth dog compatible with the thickest right angle block to provide more support.

72 files all with the aim of helping you to hold / support sheet materials leaving your hands free to apply screws or nails.
I originally designed this full set with the aim of it being all about drawer box assembly, to make it quick, repeatable and stress free. During the design and testing process I quickly realised that this set of jigs is far more versatile and can be used for larger or smaller projects.
There are a number of different permutations of the files to cater for different sheet material thicknesses, including the most common. And a fully adjustable support jig with sliding jaws for the non standard jobs.
Please note that the corner, t joints and triangle joints all have the same thickness of base to ensure they are compatible with each other.
Below I have put the description for each folder of files and the settings I used to print them in PETG HF on my Bambu Lab 3D Printer. You may find you need to adjust the settings for your needs but they will be a good guide.
File 1 - Corner Braces - 4 walls, 25% infill, no supports.
Also labeled as corner clamps. These simply slot over the corner of the 2 boards you wish to join. There are 6 different sizes for the following thicknesses of materials. 10mm, 11mm, 12mm, 13mm, 17mm and 18mm
There is a large and small for each size too. Meaning you can have more strength for larger panels.
I apply one top and one bottom for total stability.
File 2 - Drawer pull templates - 3 walls, 25% infill, no supports.
Save on drawer pull hardware.
11 styles of template designed to be used with a router. Simple set the location where you want to remove finger space on your drawer front. Locate the template using the 2 tabs and trace the area to be removes.
Then cut to within 1 to 2mm of the line, reapply the template, fixing it with either clamps or good double sided tape. Then using a bearing guided flush trim router bit, with the bearing following the template remove the remaining material. Taking care to follow all safety requirements.
File 3 - One handed corner clamps - 4 walls, 40% infill, some supports.
These are designed to be added to squeeze clamps, simply remove the inner jaw rubber that the clamps come with and replace with these prints. Then you can quickly clamp a corner of 2 boards. Note that this is not a solution for glue ups, just for quick hold to give you 2 hands free to apply fixings.
There is one top jaw addition, a simple triangle.
There are 4 designs for the bottom. I have specifically made the one called best design to not need supports and to be the largest and strongest. It is the one I recommend as the others need supports and are not as strong.
If the prints are too tight or loose simply scale to fit.
File 4 - Sheet Material centre scribes - 3 walls, 20% infill, no supports.
The simplest and one of the most useful.
When driving screws or drilling into a Butt joint it is really handy to know you are hitting dead centre of the board that will receive the screw thread to avoid splitting.
These simple prints make that easy. There are 2 styles, one for thin leaded pencils or pens and one for the thicker Pica or Tracker style ones.
There are 6 holes on each print aimed at either 12mm or 18mm sheets with 1mm ± either side. thats ½ and ¾ inch sheets in imperial.
File 5 - Right angle blocks - 3 walls, infill depends on the file you choose, no supports.
These are just clamping right angles. So useful and simple in their job.
There are 3 sizes, each with 4 iterations.
Small, medium and large. Each one designed for different sized glue ups.
Each size has 4 iterations,
No support
Support
Skinny, no support
Skinny Support.
The idea here is that if you want to save filament then print with a support as this adds another bar across the bracket.
Personally I find the skinny ones to be just fine with 4 walls and 40% infill, but the non skinny offer more clamping space, though it comes at a cost of filament and time.
The non skinnys were printed with 4 walls and 30% infill.
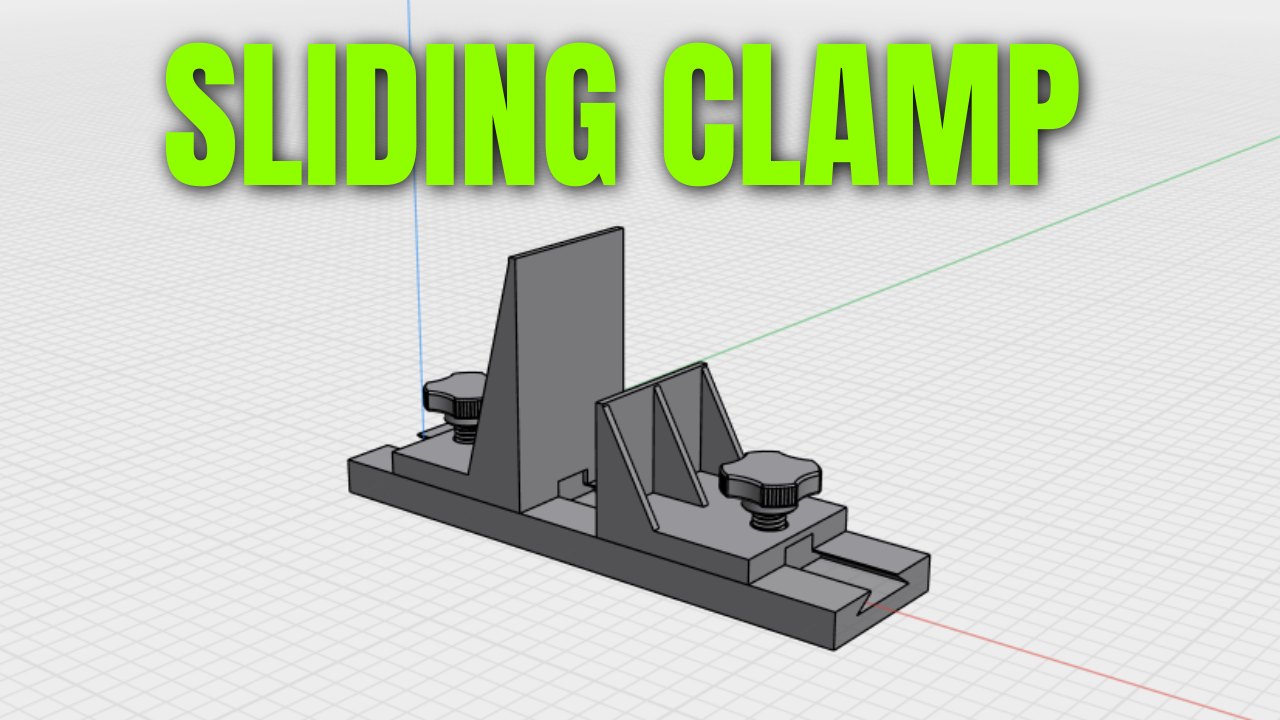
File 6 - Sliding clamps.
All pieces but the bolt are 4 walls and 25% infill
Bolt is 4 walls and 90% infill to avoid snapping.
The only piece needing supports is the track due to the dog holes on the underside.
This was a whim that turned into one of the most useful additions in the files.
The aim here is to have a fully adjustable clamp that you can glue a dog hole into to allow it to be set into a workbench. Allowing you to clamp a board on its edge to do jibs like applying edge banding.
They can adjust from thin to well above 2 inches, 36mm and with the larger jaw option the board height can go up to at least 500mm.
Slide the locking bar into the track, place the jaw so that the holes align and apply the bolt. Tightening the bolt draws the bar into the jaw and locks it into the track.
If the bolt snaps which I found happened in early iterations of the design, ensure it is cool and not right after printing, and set the infill to 100% if needed. This should be enough to get the desired tension without snapping the bolt.
If you have a standard cmc cut mft workbench then the dogs are perfectly aligned. If, like me you have drilled your own, I advise just using one dog to stop the clamps sliding.
File 7 - T-joint supports - 3 walls, 25% infill, no supports.
Much like the corner braces, these are designed to sit on a piece of sheet material where a T joint is being made. Use the centre scribe to mark the board being added in. Not the one you are sitting the t brace on, then use the viewing window to line the centre line with your mark for alignment.
There are 6 thicknesses of materials that these are compatible with. 10mm, 11mm, 12mm, 13mm, 17mm, 18mm. and each thickness has 3 sizes. There is the larger option both in low and high. And my favourite for smaller jobs the mini.
Note, these can also be used as corner braces in a pinch.
File 8 - Simple triangle supports - 3 walls, 25% infill, no support.
Align the print so that the triangle support is not upright, rather lying on its side to avoid supports.
These work with the corner braces and t joint supports to hold sheet materials while you use 2 hands to apply fixings.
These are designed to hold each board upright with speed and strength.
They also have the same base thickness so that they are fully compatible with the corner braces and t joint support.
If you have read this far, thank you so much. I appreciate you for even considering these files. If you have questions about printer settings or the jigs/files themselves please see the latest video on my page. Linked here.
I hope you get value and they prove to be useful !
Everything you need to add control to your ungainly dust extraction hose. And More.
This bundle is designed to be used with the thinner hoses from dust extractors rather than the larger chip collector hoses.
The bundle contains 4 identical folders, each one adapted for the 4 commons hose sizes 26mm, 32mm, 35mm and 38mm. Though you may find that like me, if you have the festool 35mm hose that the 38mm clips fit better on the main body of the hose, whereas the 35mm clips fit better close to the nozzle. This is why you get all 4 size related bundles for one price. Chop and change as needed.
Each bundle includes the same items, each scaled to the best fit for the hose.
For strength I used 6 walls, 35% infill with gyroid. But you can adapt if you feel you need more or less strength / more of less print time.
Contents of each bundle.
The pictures also describe these files better than my words.
File1 - The Hose Raiser head - designed to be used when making your own dust hose raiser.
The raiser supports your hose above your work so you dont have to carry the weight. Simple attach the raiser head on the top of a 35mm square length of wood and you are on your way . See this video for full build.
The only construction needed is to glue a 3mm pin into the hinge. For mine the fit was so tight I didnt need to use glue. If you do need glue, ensure no glue makes contact with the inner hinge piece.
File 2 - Hose Raiser Brackets and pins - These attach to the side of your cabinet or workbench to support the hose raiser bar. I recommend 2 per build, and keep them pretty close and high on the side of whatever you plan to attach your raiser to. That way you get stability when it is up high. These too are designed to be a tight fit for a 35mm square bar. There is a pin in the file too that comes in 2 parts, the first is the grip and the second the pin itself. I found printing these separate and gluing together the pieces worked best.
File 3 - Hose holder fixed clamp - This permanently attaches to the hose close to the nozzle. The Dog is printed separate, simply glue the dog into the recess under the clamp allowing you to mount your hose in a dog hole in your bench. See the video for full details and whether to use a sliding dog or normal dog. Both are included in the bundles. (recommend the sliding dog as a best of both worlds solution)
File 4 - Hose holder fixed wall clamp - Designed to be attached to your dust hose in an area where you want to permanently fix it to the wall or ceiling.
File 5 - Hose holder sliding mount - A wall bracket designed to be used with the sliding dog and fixed clamp so you can place the mount anywhere you wish to hold your hose allowing for easy access. Simple slide it on to fix it in place and slide it off to use it.
File 6 - Dog port loose and tight - Simple dog holes that you can fix to the wall where, much like the sliding mount you can push your affixed fixed clamp in using the dog and friction to hold it in place.
File 7 - Hose holder wedge wall and dog - An open hose holder that you can fix to your wall or ceiling to hold your hose in place allowing for quick release and use.
File 8 - Slimline hose holder wedge - as above but more slimline, ie closer to the wall or ceiling. Use the one that suits your needs and clearance requirements best.
File 9 - Simple 19.9mm dog - The dog as a separate file so you can print and glue it into the fixed clamp as needed.
File 10 - Sliding dog - as above but with the tapered groove allowing for use with the hose holder sliding mount.
If there are any questions, answers will most likely be found in the following videos.
The pictures also describe these files better than my words.
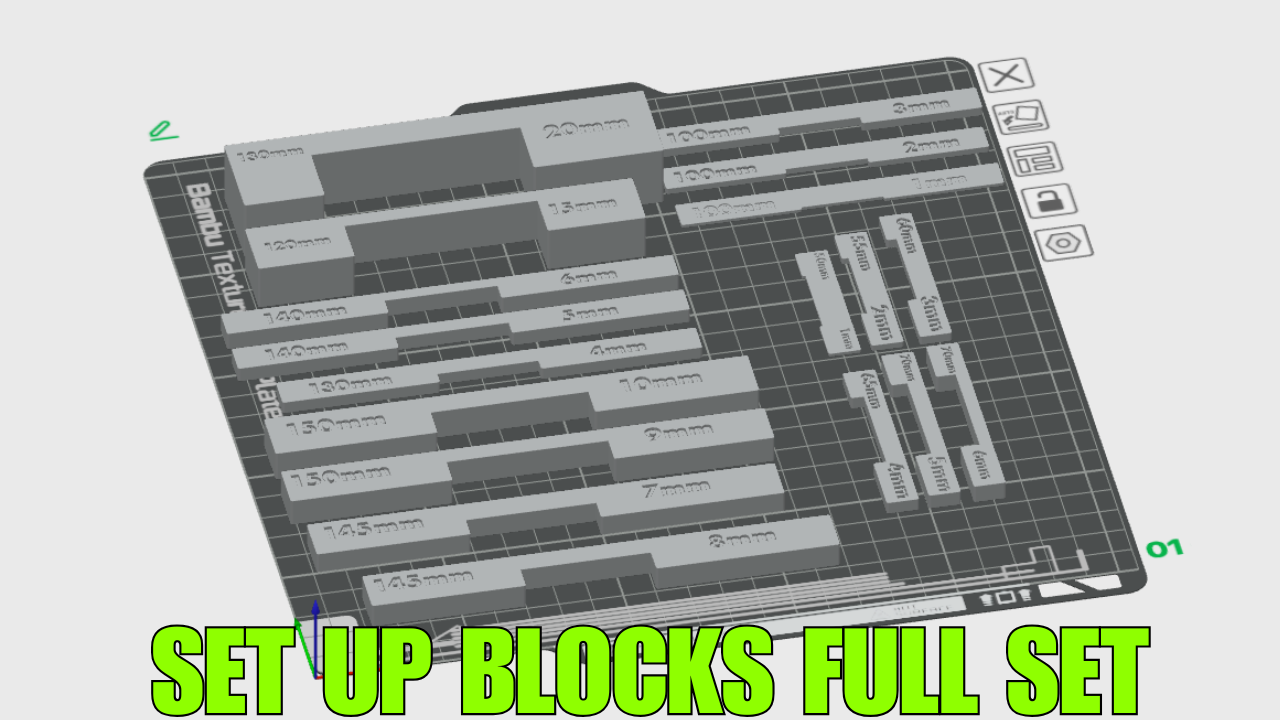
These set up blocks are Metric and range in sizes from 1mm thick to 20mm thick .
The file includes long blocks for a table saw and short blocks for a router. Or wherever you find a use for them.
They have the thickness marked on them and this corresponds to the height of the recess in the centre too.
So you can use them to set a fence or to get an accurate blade / router bit height too.
I have also given them different lengths as that seemed to be a useful addition.
I have printed mine with PETG but PLA is fine too, 3 wall, 15% infill and if you are feeling fancy you can use the iron function on the top surface.
I would not recommend printing all at once as all printers are calibrated differently. For this reason I have made a separate file for the 5mm short block. This way you can print it and using calipers on the width see if you need to raise or lower the 100% scaling to get the blocks as accurate as possible. If you scale the 5mm block to your printer, the same calibration will work for all blocks.
If you do need to scale, and you download the free plans for the holders, you may need to scale these too.
Blocks come in the following sizes.
Long 20mm, 15mm, 10mm, 9mm, 8mm, 7mm, 6mm, 5mm, 4mm, 3mm, 2mm, 1mm
Short 6mm, 5m, 4mm, 3mm, 2mm, 1mm.
Lengths covered, 150mm, 145mm, 140mm,130mm, 120mm, 100mm, 70mm, 65mm, 60mm, 55mm, 50mm.